Monday, October 31, 2011

Noah's Garden


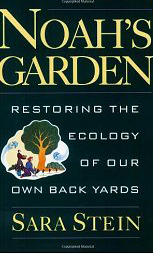
One of the ASBA Conference presentations involved learning to recognize ecosystems--the plants, insects and animals and their dependencies. Bringing it home was a recommendation for Noah's Garden. With technology being what it is today, I was able to order the book from Amazon on my iPad via the hotel's wifi while the presentation was under way! 

This book a story of how the author built up her few acres with natural plantings rather than a general how to. There are a series of appendices that detail plants for butterflies (other pollinators missing) and larvae and berrying plants. There's also a list of helpful books.

I've been thinking for some time of natural planting my little yard and perhaps next year will be my opportunity. Actually I am part way there with a few hollies and crabapples. There will be plenty of time to plan as the snow flies this winter.

Sunday, October 30, 2011

Early Winter Storm

The storm has safely passed through this area. The snow is now nearly melted but earlier caused broken limbs and a short power outage. I'm very lucky. Here's a quote from the local newspaper The Boston Globe:
Hundreds of thousands of Massachusetts residents remained without power this morning after a major nor’easter that dumped rain and up to 30 inches of wet, heavy snow. Authorities said the storm played a role in three deaths, two in a car accident and one because of a power line downed by the storm. One National Weather Service forecaster expressed astonishment at the magnitude of the unusually early storm, which began two days before children were expected to make their rounds for Halloween. “Fifteen thousand years ago, in the Ice Age, I’m sure they had more snow,” said Bill Simpson. “But for the modern day, this is unbelievable.”


By late afternoon around the lake one would never know of the brief winter encounter.


Saturday, October 29, 2011

New Brushes and New Friends

After posting last night, I began shopping in the Rosemary & Co catalog and read that squirrel doesn't have a snap back. And today, by special request of the ASBA Conference managers, Rosemary was back for sales this morning! She confirmed what I read and I tried a wet squirrel brush as well.

From there, I ended up with a few small Kolinsky filberts (aka cat's tongues) in sizes 0, 2, and 4. Nice little brushes!

Today marked the close of the ASBA Conference, but still with post-conference workshops taking place. The past two days are rather a blur at the moment. I've absorbed so very much information from botany to color to the business of art shows to genetics to the work of grant recipients to the very latest in sophistocated online botanical resources (of which I will be volunteering for beta testing and images--more later as that develops). I've also met many artists and made many new friends.

I've turned into a true night owl since retirement and these early mornings flying down the highway have left me jet-lagged and just plain bonkers, but it's surely been worth it.

Friday, October 28, 2011

ASBA Conference

It was a full day of  fascinating ASBA presentations as I provided technical assistance for the following:


But before the presentations began, I happened upon Rosemary of Rosemary & Co. She is a wonderful person, very friendly and informative. I explained my wish for a soft brush without a hard point, something for small area egg tempera washes. Rosemary immediately replied "Squirrel!" and handed one over. Somehow I was of the idea that squirrel was a coarse fur. This brush was so soft! There were not many with her so I'll be looking through the catalog and placing an order soon. And in the catalog I also ran across rounded Kolinksy's (series 66, series) and red sable (series 79), more brushes I'd like to add to my tempera set.


Thursday, October 27, 2011

More Charts

Here's a bit more of my foundations homework. Not terribly exciting but I'm getting to practice washes.


During a short visit to the ASBA Conference I got to see the Rosemary's Brushes presentation. There was a wonderful camera screen arrangement and got to see her (the owner) assembling Kolinsky sable brushes by hand. I wonder, would Timothy mind giving up a few tail hairs for a little experiment? Hmm? Now where did that cat disappear to? ;-)

Wednesday, October 26, 2011

Botanical Palette

There's no botanical class this week, what with the ASBA Conference going on. Part of my homework is to wrap up color charts. First up is the complete palette, just laying out the colors. I've drawn out the remaining charts and labeled the pigments so tomorrow should wrap those up.


The Natural Pigments order arrived today--earth oils, lead white, linseed oils, and these cool little one ounce jars that are just perfect for egg tempera mixed pigments.


Tuesday, October 25, 2011

ASBA Conference

The annual American Society of Botanical Artists (ASBA) Conference is taking place this week. Botanical artists from the world over are joining together at the Boston Marriott Newton hotel for meetings, gatherings, tours, presentations, and workshops, all hosted by the New England Society of Botanical Artists (NESBA).  Imagine, all these talented individuals enjoying each other's work and sharing their knowledge and techniques.

If you're in this area, you might like to check out the Small Works exhibit:
Boston Marriott Newton
Grand Ballroom
Friday 7:30 am to 9 pm
Saturday 7:30 am to 1 pm
More that 100 works of botanical art with maximum frame dimensions of 9" x 12" will be on display. For more on the behind the scenes efforts that went into making this exhibit possible, see this link.

And if you plan oncoming, please do let me know. During those times, I will be around as a monitor supporting presenters and have breaks during lunch.

Monday, October 24, 2011

Paint Making

Impatient for my paints and oils to arrive, I mixed up a few dry pigments with flax seed oil from the fridge. My mixes were rather on the liquid side, smooth and shiny. I'm excited of the possibilities--I have dozens of dry pigments!

There is an oil technique of applying colored glazes over grisaille but, unlike my situation, the grisaille is first allowed to dry. My colors mixed with the grays and my brush picked them up too. Won't do that again!

My tonal charts mixes with Radiant White (safflower oils mix) are still wet whereas the pure peach black (mixed with linseed) is dry to touch.


Here's a photo of me the muller at work. I was asked to supply a mulling shot for a slide show.


Playing With Oils

Just a little fun with my oils. I tried a technique of laying in patches of tone and then smoothing out. I was surprised to find  yesterday's paint still wet until I remembered that the while is mixed with safflower oil. It could take days to dry so although the Gamblin white does provide a very bright white, a linseed oil based white is needed.


Saturday, October 22, 2011

Oils Value Chart

The panel was finished up today. All together, there are two coats of Golden GAC 100 front and back, and three coats of Golden Gesso on the front and one on the back.

Using Munsell value chips (2-9) and a few oils, I practiced mixing values and applying with palette knife. I started with a brush and soon found it quite a waste of time, once I realized that mixing took place with the palette knife and not the brush.


Paints used are:
  • Gamblin Radiant White (Titanium Dioxide; Safflower Oil)
  • Wiliamsburg Ivory Black (Amorphous Carbon; Linseed Oil)
  • Holbein Peach Black  (Aniline Black and soot from lamp; not sure but probably Linseed)

Safflower or poppy oil is sometimes used with white to reduce the slight yellowing of linseed oil, so this Gamblin white will push the very high end of white in the Munsell scale, perhaps as high as 9.75. (In fact, some oil brands are mixed exclusively with a non-linseed oil.)

Holbein's Peach Black is known as one of the blackest blacks, pushing the low end of Munsell down to 0.5.

I'll be picking up an extended Munsell value chart that better displays values. It presents in quarter values with, for deeper blacks, a glossy finish.

And lastly, there's a Natural Pigments order on the way: earth oil paints and grinding oils.

Having a stock of dry pigments is so exciting! With an appropriate binder (gum arabic, egg yolk, linseed oil) I can produce watercolors, egg tempera, and oil paints, all from the same material.

Friday, October 21, 2011

New Still Life Box

Here's a new still life box assembled with a sheet of black foam core and a bit of scotch tape. I'm hiding it from Timothy, afraid if he gets his paws on this one that it won't stand up like the old one.


Below are a couple of quick shots testing things out.


Another little project going on here today is prepping a panel. While picking up the foam core I grabbed a piece of hardboard and this evening put down the first coat of Golden's GAC 100. I will apply a second coat and then come layers of acrylic dispersion polymer, aka "Gesso".

Well, we know that this acrylic stuff is not real gesso and certainly will not work at all with egg tempera. But as prep layers for acrylic and oil, it's a fine product. If you are guessing that about to dabble into oil, well...

Thursday, October 20, 2011

A Warmer Green

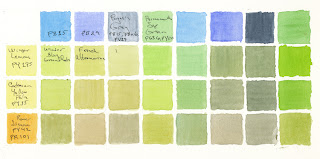
I found a bag of lemon ochre and that with Bohemian Green Earth brought me a warmer green. A Verona Green Earth from Natural Pigments is a similar pigment and with a smoother grind. It's the sample to the right in the image.

I will need to mull the Bohemian as it is rather clumpy and takes a lot of palette knife work to work smooth. (I still seem to miss some clumps that only become apparent as the paint settles.)

Kremer has a couple of yellow ochres described as greenish so there is soon to be an order for these and more.


Wednesday, October 19, 2011

Pigment Testing

These minerals, yellow ochre and green earth, simply will not reach into high chromas and so won't match up with the hosta photo or actual leaf. I may give them a go any way.

Just before I stopped I remembered a new green earth, Bohemian, came in last week. It's on the yellow side. The Russian green earth I used most of this evening was definitely bluish--probably good for shadows but not for local color.

I think my yellow ochre leans warm. I'll dig through my box of pigments for a lemony ochre but I think it may be time for another Kremer order. Good excuse to pick up a few more pigments!

I'll play around more with color while I get off a few shots with proper lighting, something with Old Masters properties. That scanned image won't make it here.


Green earths, yellow ochre, titanium white.

Tuesday, October 18, 2011

Hosta Starter

I often have a fit of time starting a new project. I figure that I should have a pocketful of ideas ready for development. Alas, that intent is undeveloped.

This Hosta scan has a luminosity that I think will work nicely in egg tempera. I want to follow the botanical process I'm being taught before getting down to the actual panel.

I won't know until I get to the color studies if I can pull this off with natural minerals only, no synthetic organics, that is. I think it will come down to the available chroma of my green earths.


Monday, October 17, 2011

Hughes/Donahue Gallery

Today I dropped off the Crabapples and Lily paintings with the Hughes/Donahue Gallery. Signed a contact and set the titles and prices. There are 20 artists and each can present up to 3 pieces.


Sunday, October 16, 2011

My Sig

Back when I sold my first painting I was scrabbling to come up with a signature. I settled on a hexagon with my initials. Don't you know, I forgot to sign to sign my new panels before framing. Today I went in carefully marking off the hexagon and thought that Holbein Rich Gold (G 643) gouache might work--that and a double aught Series 7 got the job done nicely.


Saturday, October 15, 2011

Panel Mount and Frame Finish

The framing tools order arrived today. The Fletcher FrameMate made for an easy job!

My first pin driving attempt went well.

Pins are held held in place with a magnet.

My first panel pinned in place. It held so tightly that there was no need to shim the panel to one side.

Job complete! Double-sided tape holds the dust cover paper in place. Paper edges were sanded for a nice transition. Pilot holes were first drilled to prevent wood splitting. D hangers were screwed in lightly to allow for hanger movement.

I love my feeling of independance being able to frame my work. Grinding and mulling pigments add to my satisfaction. I must begin making my own gesso panels.

Friday, October 14, 2011

Process Overview

After finding my first mixes a bit on the yellow side, I remixed with stronger blues. The squares lowered in value and chroma too.

Here's the tonal study with each leaf numbered.


And finally the start of a painting. To the right is the palette and mixes with corresponding numbers from the tonal study. The idea is to work with the color chart and tonal study and real leaves. The darker tones of the green leaves first get a layer of Lemon Yellow Nickel Titanate, an opaque pigment. Next a few layers of an appropriate green are added with the edges smoothed with a separate brush clear water.


That is pretty much this week's homework. I will probably take some time to practice this process with a few more leaves. And, I think it's time to revisit my neglected botanical art library.

If all goes well, tomorrow I'll be learning how to mount my panels in frames!

Thursday, October 13, 2011

Back to Homework

Here's part of the class's palette. This week's homework has us building a simple green mix chart. I botched up a couple of labels across the top but the pure paints are across the top and down the left.

You may notice that there's a split primary palette in here--warm and cool yellows, same for blues. We're using these paints for color matching to the lettuce mix. Sarah says we match to real leaves and not photographs. My grumbling fell on deaf ears. :-)


Wednesday, October 12, 2011

Lily Framed

I'll soon meet with a local gallery owner for his last exhibition of the season. Each artist can present up to three paintings. I plan to go in with this painting and yesterday's crabapple.


I've ordered up all the needed framing equipment: FrameMate, points, wire, hangers, and dust cover paper.

Tuesday, October 11, 2011

Crabapple Framed

I couldn't wait. Last night I spent a few hours on the painting and today picked up the frames. It's not mounted yet, just dropped in to see the look. I like it! There's still some cleanup and signing. It will need a bit of shimming to keep the panel properly in place.


Monday, October 10, 2011

Dried Rose Study

Here's a little exploration with my dried roses. This was so enjoyable--I've really missed my egg tempera.


Sunday, October 9, 2011

Roses and Munsell

I figured I'd play with color today. I cracked an egg and sanded a board... and then thought that a bit of color exploration with Munsell chips would be fun. Sidetracked again.

This series of chips is from the 5Y chart. Isn't this fascinating? These colors give me a sense of green. Low chroma yellow displays as muted greens! I remember this happening in my Zorn palette explorations when I mixed yellow ochre and vine black and got these kind of greens.

Okay, so the general hue and chroma has been established. (These first two columns of the 5Y chart are chroma 2 and 4 respectively.) What's the value? Squint. I see it somewhere between 5 and 6.


The dried rose petals are a complex myriad of colors, never mind the iridescence that adds richness. (Can I capture that in egg tempera?)

There are some low values here that seem to fit into this range of chips.


Here's a look at the overall 5RP chart. Isn't it amazing the range available with just this hue?


It would probably be fair to wonder just what it is that I am up to. I don't expect to be running around holding Munsell chips up to everything in sight (although I will from time to time do just that). I think that exercises like these open up my color experience and also get me thinking about tonal value.

I've been reading up a good deal on using Munsell with oils. In fact, I have just a very few tubes on the way for some beginner tonal exercises. But it seems clear to me that egg tempera is a special case, being of so many layers. I mean, it's not like mixing a string of values  with the same hue and chroma, perhaps useful for turning form. Well, maybe I could mix something like that with egg tempera, but I'd still want the layers.

So you see, I'm somehow plotting my course, with as many questions as answers. And that may never change.

Saturday, October 8, 2011

Botanical Closing In

The tracing is done and here some form has been added. More detail with tone and copying the tracing to watercolor will complete the homework. Sarah gave me the okay to work with images on my iPad instead of printing out color and b/w versions.


I peeled a few rose petals and compared to my Munsell chips, surprised at the low chromas. I came up with a few pigment possibilities that I hope to explore tomorrow.

And speaking on pigments, here is a video interview of Michael Price that I found inspiring. I hope you like it too.

Friday, October 7, 2011

Botanical Continues

This evening takes us through steps 7 through 9.

7. Refine specimen boundaries.
8. Photograph drawing.
9. Photograph specimen layout. (if delicate greens seem to move about.)

The boundaries and main veining are in place and the drawing is scanned. Scratch step 9 as I've moved the specimens about and some leaves are curling.

Next up is to trace this drawing and transfer to watercolor paper. Once the tracing is complete, tonal values can be added to the drawing.
Refine boundaries.

I received a bouquet of flowers from my coworkers during my retirement sendoff. I kept the roses as they dried out so nicely. I never realized how great they would continue to smell! The early morning sun (which I hardly ever see these days!) sidelights them so perfectly so this evening I tried to mimic that light with my trusty cardboard light box. More work is needed here, and perhaps new roses as well, but I am inspired to paint dried roses in egg tempera. I thought I'd put this medium on hold until I wrapped up the botanical class but the attraction is too strong. I even ordered up a few new dry pigments today. So although this rose might not be the model, certainly not this photograph, I can always take some time to explore color studies.

By the way, this photograph was "stacked". Four separate shots focused at various focal planes were then assembled as layers in Photoshop and  merged. I probably could have, and should have, worked with more layers--I'm a little rusty with this technique.


And just a bit of news here... My friend Bob, a professional portrait photographer, had me to his studio this afternoon to help me select a frame for my crabapple painting. The frames (I ordered a second in case I decide to copy the painting) will be in Tuesday so we'll soon get a good look at that final package. Well, almost final, as I want to rework that painting with a bit more depth. I remember Koo saying that when you think you're done, you can always glaze in more layers and add  richness.

Thursday, October 6, 2011

A Process Starter

Last week was hollies; this week it's greens. Sarah laid out a Stop & Shop mix and brought us through the steps of the process detailed in yesterday's post. In class I made it to the step of refining leaf edges. I decided to toss my work and start over, for practice and to detail the process here.

This post takes us through the first six steps detailed in yesterday's post.

A package of spring mix to add to my class specimens.

I pawed through the mix, looking for the just right leaves.

Once selected, each leaf was trimmed to open a fresh stalk. From this point on, the leaves are kept on wet paper towels and spritzed. (I later changed my mind on a couple of leaves.)

Timothy was in one of his howling moods.

Final arrangement, ready for initial measurements.
Key dimensions, measured with dividers and transferred to the drawing.
Roughed in outlines.

Note that the drawings above are considerably lighter, enhanced for display. At this time, I'm refining the outlines, will then add veining, and lastly apply tone. More tomorrow!


Wednesday, October 5, 2011

A Botanical Process

This week's class established a process to follow for each botanical painting. This is my interpretation of that process and will likely contain inaccuracies. For tonight, I will lay out all the steps as I remember and in subsequent posts will dive into the details. (Next week will add more steps when watercolor is added to the process.)

  1. Select specimens and prep.
  2. Design layout.
  3. Photograph specimen layout.
  4. Measure key dimensions of each specimen (with ruler or dividers).
  5. Transfer measurements to drawing paper.
  6. Rough in specimen outlines and prominent features.
  7. Refine specimen boundaries.
  8. Photograph drawing.
  9. Photograph specimen layout. (if delicate greens seem to move about.)
  10. Trace drawing to tracing paper. (Mark up side.)
  11. Add tonal values to drawing. (Basic light, dark, light, dark. Followed by tonal details.)
  12. Flip tracing and copy lines with HB.
  13. Flip back to up side of tracing paper, position over hot press paper (to left, leaving room for upcoming color studies), and transfer using sharp 2B.
  14. Print photograph in color as well as black and white.

Some of these steps might sound a bit cryptic but will hopefully clear up as I delve into each step with photos. More soon!


Tuesday, October 4, 2011

Beyond Homework

Today I wrapped up the hollies with shading and line improvement. Tomorrow's class gets us started with watercolor.

I'm still working with my Munsell studies and recently came across this link: http://munsellcolor.webnode.pt/ These tests are quite challenging and fun.

I am very fond of the moonlight scenes of John Atkinson Grimshaw. That I could learn to handle to handle light like that... See his complete works here.

The Old Hall Under Moonlight
John Atkinson Grimshaw
The week's pencil work has me thinking and wondering. It would seem that unless one specifically wants to distress the paper's surface that there should never be a need to press so hard as to leave an indentation. All of the medium should rest on the support. Makes sense, I think.

And lastly, I just started M The Man Who Became Caravaggio by Peter Robb. Time to get into chapter 2!